Managing LVM in linux
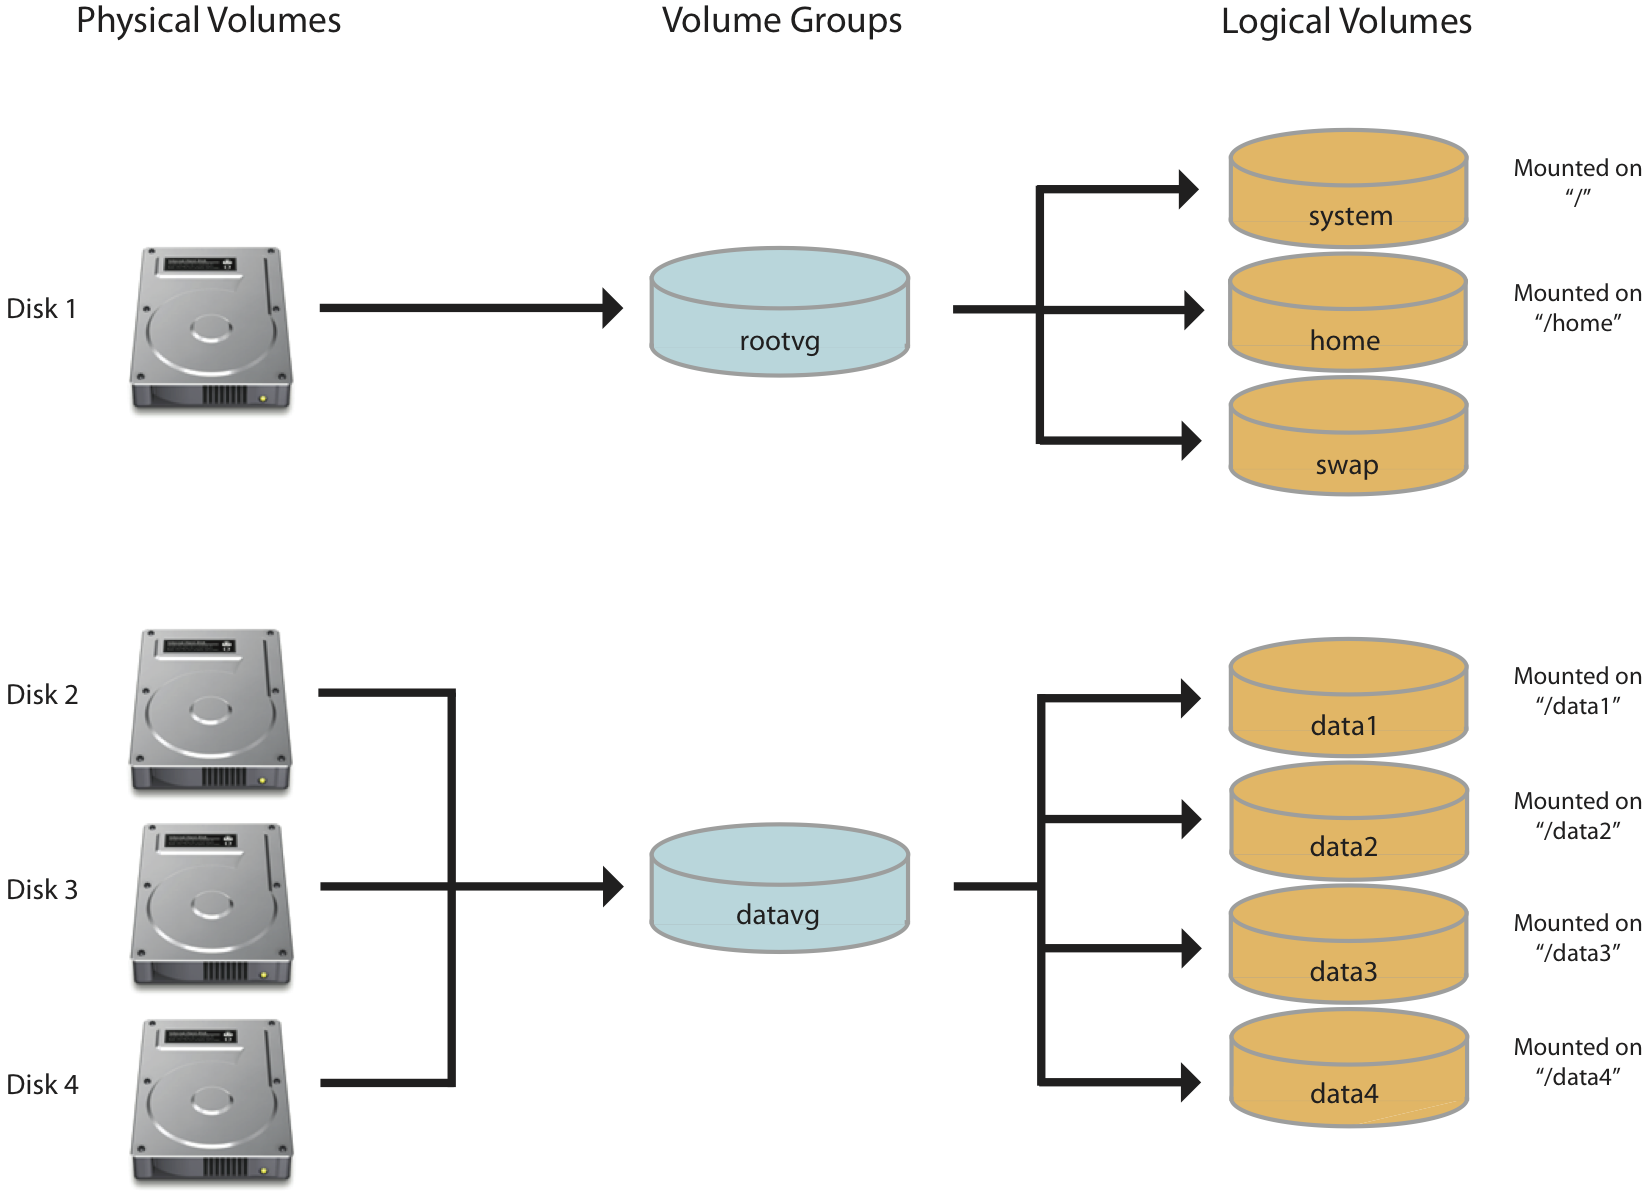
In LVM there are 3 main consideration and they are
1. Physical Volume # deal with harddisk
2. Volume group # deal with physical volume
3.Logical volume # deal with OS
To create a Logical volume we need to have physical volume and volume group
Initial method:
i) Insert a new hard disk in system
ii) check the new harddisk partition name (eg: /dev/hd2 or /dev/sdb)
iii) follow the below command ,
fdisk -l # display all the partition
fdisk /dev/sdb # Incase ur new harddisk partition name is sdb
(in fdsik console)
n # create a new partition
p # to create primary partion and e- for extended partion
1 # represent partition number
then press Enter button twice # to use full partition and incase u required to create multiple partition choose cylinder(first & last) size as required.
Now partition is created and we need to select the partition type(i.e. LVM)
t # to change partition type
8e # for LVM partition type and for use L for help list
p # print command to verify is created successfully or not
w # write the changes to the disk
a) To create a physical volume
pvcreate /dev/sdb1 # becoz we have partition the new disk as sdb1 in above command
pvdisplay # to view the physical volume
b) To create a volume group
vgcreate vol1 /dev/sdb1 # where vol1 is volume group name
c) To create a Logical volume
lvcreate -L 10G -n lv1 /dev/vol1 # where -L size need to be assigned to logical volume
# where 10G is the size of logical volume
# -n is to name needed to be given to logical volume and -n is not need if already logical volume is present
# lv1 is name of logical volume
# vol1 is volume group that lv1 assigned to, so it take space from it
d) To format the logical volume
mkfs.ext4 /dev/vol1/lv1 # to format lv1
e) To mount the logical volume
mkdir /mnt # to create a mount point where u like to mount the lvm
mount /dev/vol1/lv1 /mnt # it will mount the lvm in /mnt directory
Note: the mount will be available only on current session to permanently mount this partition add the entry in /etc/fstab
to permanent mount edit /etc/fstab file and the entry mentioned below at the end of the file
/dev/vol1/lv1 /mnt ext4 defaults 0 0
f) To Extend a volume group
i) first requirement is we need new hard disk becoz we have used total harddisk in previous example
ii) use the initial method mentioned above and give new partition number (e.g: /dev/sdc1)
vgextend vol1 /dev/sdc1 # how vol1 is extend
Note: if sdb1 is 5GB and sdc1 is 5GB and now vol1 size is 10GB after vgextend command
g) To extend logical volume
extend method can be achieved using two method one by giving fixed value and and another by using add .
i) using fixed method
lvextend -L 7GB /dev/vol1/lv1 # now lvm size is 7GB
ii) using add method
lvextend -L+4GB /dev/vol1/lv1 # if existing lvm size is 5GB and 4GB is added and now total size of lvm is 9GB
h) To resize the logical volume
until you resize command in lvm, system cant use the extended lvm size.
resize2fs /dev/vol1/lv1
h) To reduce logical volume
i) umount /dev/vol1/lv1 # unmount the logical volume
ii) e2fsck -f /dev/vol1/lv1 # checking filesystem for any error
iii)resize2fs -p /dev/vol1/lv1 5G #resize the filesystem to 5GB and -p for print
iv) lvreduce -L 5GB /dev/vol1/lv1 # reducing lvm size
v) mount /dev/vol1/lv1 # remounting the lvm module
g) To snapshot logical volume manager
we need to add a new harddisk /dev/sdd1 and mount it in vol1 as follow or you have already using /dev/sdc1 in vol1 for this task.
pvcreate /dev/sdd1 # creating physical volume
vgextend vol1 /dev/sdd1 # extending volume group size
lvcreate -L 50GB -n lv1backup /dev/vol1 # creating logical volume of 50GB size
mkfs.ext4 /dev/vol1/lv1backup # formating logical volume
mkdir /lvmtest # creating mount point
mount /dev/vol1/lv1backup /lvmtest # mounting logical volume
To mount permanently add the entry in /etc/fstab
/dev/vol1/lv1backup /lvmtest ext4 defaults 0 0
lvcreate -L 20GB -s -n lv1snapshot /dev/vol1/lv1 # lvm snapshot creation
mkdir /backup # creating mount point
mount /dev/vol1/lv1snapshot /backup # mounting snapshot
# for backup we can use two method using tar and dd(i.e: image)
using tar
tar -pczf /lvmtest/lv1.tar.gz /backup # backup of lv1 in /backup dir
or using image
dd if=/backup of=/lvmtest/lv1.dd # backup of lv1 in /backup
umount /backup # unmounting for freeing the resource
lvremove /dev/vol1/lv1snapshot # removing lv1snapshot
h) To rescue the lvm using lvmsnapshot backup
i) first we need to boot the os in rescue mode
ii)then mount the partition
mount # mounting the file systems
dd if=/lvmtest/lv1.dd of /dev/vol1/lv1 # rescue of lv1
In LVM there are 3 main consideration and they are
1. Physical Volume # deal with harddisk
2. Volume group # deal with physical volume
3.Logical volume # deal with OS
To create a Logical volume we need to have physical volume and volume group
Initial method:
i) Insert a new hard disk in system
ii) check the new harddisk partition name (eg: /dev/hd2 or /dev/sdb)
iii) follow the below command ,
fdisk -l # display all the partition
fdisk /dev/sdb # Incase ur new harddisk partition name is sdb
(in fdsik console)
n # create a new partition
p # to create primary partion and e- for extended partion
1 # represent partition number
then press Enter button twice # to use full partition and incase u required to create multiple partition choose cylinder(first & last) size as required.
Now partition is created and we need to select the partition type(i.e. LVM)
t # to change partition type
8e # for LVM partition type and for use L for help list
p # print command to verify is created successfully or not
w # write the changes to the disk
a) To create a physical volume
pvcreate /dev/sdb1 # becoz we have partition the new disk as sdb1 in above command
pvdisplay # to view the physical volume
b) To create a volume group
vgcreate vol1 /dev/sdb1 # where vol1 is volume group name
c) To create a Logical volume
lvcreate -L 10G -n lv1 /dev/vol1 # where -L size need to be assigned to logical volume
# where 10G is the size of logical volume
# -n is to name needed to be given to logical volume and -n is not need if already logical volume is present
# lv1 is name of logical volume
# vol1 is volume group that lv1 assigned to, so it take space from it
d) To format the logical volume
mkfs.ext4 /dev/vol1/lv1 # to format lv1
e) To mount the logical volume
mkdir /mnt # to create a mount point where u like to mount the lvm
mount /dev/vol1/lv1 /mnt # it will mount the lvm in /mnt directory
Note: the mount will be available only on current session to permanently mount this partition add the entry in /etc/fstab
to permanent mount edit /etc/fstab file and the entry mentioned below at the end of the file
/dev/vol1/lv1 /mnt ext4 defaults 0 0
f) To Extend a volume group
i) first requirement is we need new hard disk becoz we have used total harddisk in previous example
ii) use the initial method mentioned above and give new partition number (e.g: /dev/sdc1)
vgextend vol1 /dev/sdc1 # how vol1 is extend
Note: if sdb1 is 5GB and sdc1 is 5GB and now vol1 size is 10GB after vgextend command
g) To extend logical volume
extend method can be achieved using two method one by giving fixed value and and another by using add .
i) using fixed method
lvextend -L 7GB /dev/vol1/lv1 # now lvm size is 7GB
ii) using add method
lvextend -L+4GB /dev/vol1/lv1 # if existing lvm size is 5GB and 4GB is added and now total size of lvm is 9GB
h) To resize the logical volume
until you resize command in lvm, system cant use the extended lvm size.
resize2fs /dev/vol1/lv1
h) To reduce logical volume
i) umount /dev/vol1/lv1 # unmount the logical volume
ii) e2fsck -f /dev/vol1/lv1 # checking filesystem for any error
iii)resize2fs -p /dev/vol1/lv1 5G #resize the filesystem to 5GB and -p for print
iv) lvreduce -L 5GB /dev/vol1/lv1 # reducing lvm size
v) mount /dev/vol1/lv1 # remounting the lvm module
g) To snapshot logical volume manager
we need to add a new harddisk /dev/sdd1 and mount it in vol1 as follow or you have already using /dev/sdc1 in vol1 for this task.
pvcreate /dev/sdd1 # creating physical volume
vgextend vol1 /dev/sdd1 # extending volume group size
lvcreate -L 50GB -n lv1backup /dev/vol1 # creating logical volume of 50GB size
mkfs.ext4 /dev/vol1/lv1backup # formating logical volume
mkdir /lvmtest # creating mount point
mount /dev/vol1/lv1backup /lvmtest # mounting logical volume
To mount permanently add the entry in /etc/fstab
/dev/vol1/lv1backup /lvmtest ext4 defaults 0 0
lvcreate -L 20GB -s -n lv1snapshot /dev/vol1/lv1 # lvm snapshot creation
mkdir /backup # creating mount point
mount /dev/vol1/lv1snapshot /backup # mounting snapshot
# for backup we can use two method using tar and dd(i.e: image)
using tar
tar -pczf /lvmtest/lv1.tar.gz /backup # backup of lv1 in /backup dir
or using image
dd if=/backup of=/lvmtest/lv1.dd # backup of lv1 in /backup
umount /backup # unmounting for freeing the resource
lvremove /dev/vol1/lv1snapshot # removing lv1snapshot
h) To rescue the lvm using lvmsnapshot backup
i) first we need to boot the os in rescue mode
ii)then mount the partition
mount # mounting the file systems
dd if=/lvmtest/lv1.dd of /dev/vol1/lv1 # rescue of lv1

